There are some confections that transcend mere dessert status, transforming simple pantry staples into an experience. The kind of treat that halts busy schedules, inviting you to slow down and savor every exquisite moment. Enter dark chocolate covered butter toffee – a symphony of textures and flavors, from its initial satisfying snap to the dreamy, not-quite-chewy caramel that slowly melts, intertwined with rich, salted dark chocolate. It’s a gift-worthy delight that, once mastered, will become a treasured tradition in your home.
For many, the idea of candy making conjures images of complex techniques and inevitable failures. Bubbling pots of molten sugar, scorching temperatures, and the delicate balance required can certainly feel daunting. Yet, with the right knowledge and a few invaluable tricks, transforming humble butter and sugar into glorious, crunchy, buttery toffee is entirely within reach. We’re here to demystify the process, equipping you with the confidence to create perfect buttery caramel every time, ready to be adorned with rich dark chocolate and a sprinkle of flake salt.
The Allure of Homemade Dark Chocolate Covered Butter Toffee
While holiday tables often feature an abundance of sweets, butter toffee holds a special, almost revered place. Its irresistible charm lies in a meticulously crafted balance: the inherent sweetness of the toffee, the luxurious creaminess of butter, and the delightful counterpoint of bittersweet dark chocolate. This isn't just a holiday fling; it's the kind of treat that friends and family will request year-round, a testament to its universal appeal.
What sets a truly exceptional dark chocolate covered butter toffee apart? It begins with that signature crisp crunch, achieved by spreading the toffee thinly, allowing it to shatter delicately rather than requiring a struggle. This initial texture gives way to a smooth, buttery caramel that slowly yields on the palate. The magic is then amplified by a generous coating of high-quality dark chocolate, adding depth and a pleasant bitterness. And for the grand finale? A delicate shower of flake salt. This seemingly small addition makes an enormous difference, cutting through the sweetness, enhancing the chocolate's complexity, and creating a truly addictive salty-sweet harmony that elevates each bite into an unforgettable experience.
Unraveling the Science Behind Perfect Toffee
The journey from simple ingredients to a complex, caramelized confection is a fascinating one, often intimidating for the uninitiated. Many aspiring candy makers, myself included, have faced the challenge of turning butter and sugar into something truly special, sometimes resulting in disappointment and wasted ingredients. However, understanding the basic science behind toffee making can transform frustration into consistent success.
At its core, candy making is a dance of temperature and time. As sugar, butter, and water (if used) are heated, moisture gradually evaporates from the mixture. This evaporation causes the sugar molecules to become more concentrated, thickening the liquid and steadily increasing its temperature. As the temperature rises, the structure of the sugar molecules begins to transform. Around 320-330°F (160-165°C) for toffee, a critical process known as caramelization takes place. During this stage, the sugar molecules break apart and recombine, often interacting with the amino acids and proteins present in the butter (a simplified Maillard reaction contributing to flavor and color). This chemical alchemy is what creates the distinct amber color and rich, nutty, complex flavor that we associate with perfect caramel and toffee.
Achieving this precise stage is crucial. Undercook it, and your toffee will be too soft or even grainy. Overcook it, and it will taste burnt and bitter. This is why constant vigilance and an understanding of visual cues, alongside temperature, are paramount.
Mastering the Art: Essential Tips for Toffee Success
While the science might sound complex, the practical application can be surprisingly straightforward with the right guidance. Here are the secrets to making incredible toffee consistently:
The "Brown Paper Bag" Secret
One of the most genius, old-school tricks for achieving perfectly cooked toffee without solely relying on a thermometer comes from a surprising source: a humble brown paper lunch bag. The moment your boiling toffee mixture reaches the exact shade of that brown paper bag, it's done. Pull it from the heat immediately. This visual cue is remarkably accurate, acting as a reliable indicator of the caramelization stage where the sugar has transformed into that ideal golden-amber hue. This trick, once learned, simplifies the process dramatically and has saved countless batches from being scorched or undercooked. For a deeper dive into this ingenious method, explore our dedicated guide: Mastering Butter Toffee: The Brown Paper Bag Secret for Perfect Crunch.
Be Present and Mindful
This cannot be stressed enough: the boiling stage demands your undivided attention. While a brown paper bag offers a fantastic visual aid, a reliable candy thermometer is still highly recommended for precision. Set a timer, but more importantly, stay by the stove. The mixture can go from perfectly golden to scorched in mere seconds. Stir constantly with a heat-proof spatula to ensure even cooking and prevent sugar crystals from forming on the sides of the pan. Scorched toffee is a common pitfall for beginners, but it's entirely avoidable with diligence.
Achieving the Signature Crunch
A hallmark of exceptional butter toffee is its satisfying crispness. This is largely achieved by spreading the hot toffee very thinly once it’s poured onto a parchment-lined baking sheet. The thinner the layer, the more delicate and inviting the crunch. Aim for an even spread, about 1/8 to 1/4 inch thick, to ensure uniform cooling and that delightful snap.
Essential Equipment
- Heavy-Bottomed Pot: A sturdy, heavy-bottomed saucepan (preferably stainless steel) ensures even heat distribution and prevents scorching.
- Candy Thermometer: While the brown paper bag trick is great, a calibrated candy thermometer provides an objective measure of temperature, offering an extra layer of confidence.
- Parchment Paper & Baking Sheet: Crucial for easy removal and cleanup. Lightly grease the parchment for extra insurance.
- Heat-Proof Spatula/Whisk: For constant stirring.
- Rubber Spatula: For spreading the hot toffee quickly.
Cooling and Setting
Once poured and spread, allow the toffee to cool completely and harden at room temperature. Resist the urge to rush it into the refrigerator, as rapid cooling can sometimes affect the texture, making it sticky. Patience is key here; allow it to fully set for at least an hour, or until completely firm and brittle.
Elevating Your Toffee: The Dark Chocolate & Finishing Touches
With your perfectly golden, crunchy butter toffee base ready, the transformation into a truly decadent dark chocolate covered butter toffee begins. This final layer adds richness, complexity, and a visually stunning appeal.
The Art of Chocolate Coating
Choosing the right dark chocolate is paramount. Opt for a high-quality bittersweet or semi-sweet chocolate (60-75% cacao content) that you enjoy eating on its own. The slight bitterness will beautifully complement the sweet toffee. Melting the chocolate gently is important: use a double boiler or microwave on low power, stirring frequently, to prevent scorching. For the silkiest finish and to prevent bloom (that greyish streaks that can appear on chocolate), consider tempering your chocolate. While optional for home cooks, it yields a professional shine and a satisfying snap. Once melted and smooth, generously spread the chocolate over the cooled toffee layer. You can do this on both sides for maximum chocolatey goodness, or just one for a lighter touch.
The Magic of Flake Salt
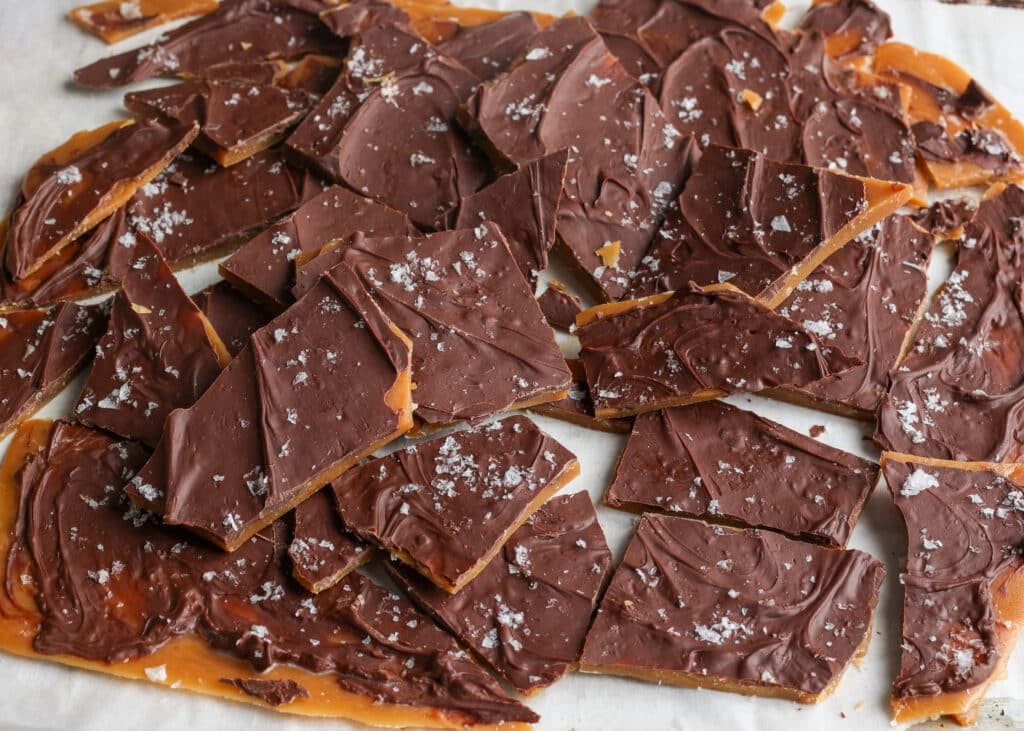
Before the chocolate sets, a sprinkle of flake salt is non-negotiable. Maldon sea salt flakes are a popular choice due to their delicate crunch and clean salinity, but any high-quality flaky sea salt will work wonders. This touch of salt isn't just for decoration; it's a flavor enhancer, creating that irresistible salty-sweet dynamic that makes dark chocolate covered butter toffee so utterly addictive.
Breaking and Storing
Once the chocolate has fully set (you can place it in the fridge for 15-20 minutes to speed this up, being careful not to introduce too much moisture), gently break the toffee into irregular, bite-sized pieces. The organic shapes add to its rustic charm. Store your finished toffee in an airtight container at room temperature for up to two weeks, or in the refrigerator for longer freshness. It also freezes beautifully for extended storage.
Your homemade dark chocolate covered butter toffee is not only a delightful personal indulgence but also makes an extraordinary gift. Learn how to turn it into an unforgettable present with our article: Savor Every Bite: Crafting Gift-Worthy Dark Chocolate Butter Toffee.
Making your own dark chocolate covered butter toffee is a journey from basic ingredients to a truly magnificent treat. By understanding the science, mastering simple yet effective techniques like the brown paper bag trick, and paying attention to detail, you can overcome any intimidation and consistently achieve perfect buttery caramel. The reward is a crunchy, rich, and utterly luxurious confection that will impress everyone who tries it. So, gather your ingredients, embrace the process, and prepare to savor the unparalleled delight of homemade toffee.
